Block of the Month Directions
Click on block to view instructions or go to the website provided. Please familiarize yourself with the guidelines below before making your block. Questions? Contact Block of the Month Chairman Betty Fessler, [email protected].
JULY 2024
GRAND RIGHT & LEFT BlocK

Click image to open PDF instruction

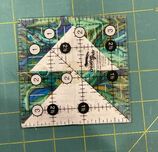
12.5” unfinished
I did all seams at a scant ¼”, I also press all seams open, and use a water drop at points that have more than 2 pieces of fabric coming together to ensure that it lays flat! This block is easier than it looks!
Cutting instructions:
From Background Fabric cut;
2 – 6 7/8” squares, subcut diagonally once, giving you 4 large “D” triangles.
4 – 2” “A” squares.
8 – 2 3/8” squares, subcut diagonally once, giving you 16 small “B” triangles.
From your medium size triangle fabric (mine is blue/green), cut 2 – 3 7/8” squares, subcut diagonally once, giving you 4 medium “C” triangles.
From your small colored triangle fabric (mine is purple) cut 12 – 2 3/8” squares, subcut all diagonally once, giving you 24 small “B” triangles.
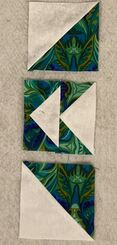
<-- This is your layout, notice we will make 4 sub blocks and lay them out in a pinwheel pattern.
The first step is to take 8 of the 24 colored small “B” triangles and set them aside. Then take the remaining 16 triangles and seam them right sides together with the 16 background small “B” triangles, lining up on the 90 degree point first, then the other two points as best you can, to make 16 HST’s.
Press seams open and trim to 2 inches.
I did all seams at a scant ¼”, I also press all seams open, and use a water drop at points that have more than 2 pieces of fabric coming together to ensure that it lays flat! This block is easier than it looks!
Cutting instructions:
From Background Fabric cut;
2 – 6 7/8” squares, subcut diagonally once, giving you 4 large “D” triangles.
4 – 2” “A” squares.
8 – 2 3/8” squares, subcut diagonally once, giving you 16 small “B” triangles.
From your medium size triangle fabric (mine is blue/green), cut 2 – 3 7/8” squares, subcut diagonally once, giving you 4 medium “C” triangles.
From your small colored triangle fabric (mine is purple) cut 12 – 2 3/8” squares, subcut all diagonally once, giving you 24 small “B” triangles.
<-- This is your layout, notice we will make 4 sub blocks and lay them out in a pinwheel pattern.
The first step is to take 8 of the 24 colored small “B” triangles and set them aside. Then take the remaining 16 triangles and seam them right sides together with the 16 background small “B” triangles, lining up on the 90 degree point first, then the other two points as best you can, to make 16 HST’s.
Press seams open and trim to 2 inches.


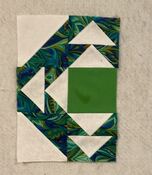
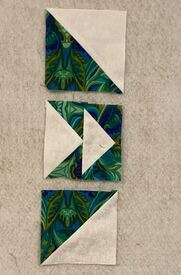
Then layout out the bottom right sub block using 4 of your newly made HSTs, 2 of the 8 colored small B triangles you set aside, 1 of the 2” squares, 1 of the medium triangles, and 1 large triangle, as in the picture below.
Notice on the right side that the two HST’s also have the small colored triangle also attached. That is what I want you to do next. Just flip the small triangle up right sides together, onto the 2 sewn HSTs, lining up at the 90 degree angle on the bottom HST and the 90 degree angle of the colored triangle, sew your ¼” seam across the bottom, press the seam open and trim dog ears even down the left side. Place back into layout.
Next we will work on the top section. Take your 2” square, check and trim if needed, then flip it over right side down, onto the right side of the 2 HST block on the top. Line up both on the right edge and sew your ¼” seam down that edge. Press open, and replace block into layout. Now take the left side small colored triangle and flip it over right side down onto the left side of the 2 HSTs block. Line up the 90 degree points of the small triangle and the background portion of the left HST. Sew your ¼” seam down that left side. Press open and trim dog ears, place back into the layout.


Lastly, you will pin two of these sub quadrants right sides together, either top to bottom by flipping down, or left to right by flipping over, your preference. Line up the 2” square to the right angle of the background large triangle on both top and bottom pieces, your seams down the long triangle edge should meet, down the seam. If you choose top to bottom, Pin all seam points along the top edge and sew your ¼ inch seam. If you choose left to right pin all seam points along the left edge. If you went right to left pin all point down the right edge. Sew your ¼” seam, Press open. Do the same with the next two quadrants. Now sew the two halves of your block together matching all points. Press seam open, don’t forget the water drop trick on the thick seam points, so that they will lay flat.

JUNE 2024
CELTIC LOG CABIN BlocK

Click image to open PDF instruction
Block 11.5” unfinished
All seams ¼”
All log strips 1 ½” wide.
I used batik because batiks don’t stretch much. If not using batiks, I suggest you cut on the straight of grain rather then the width, for less stretch. I suggest you do not use fabric that are directional, as the logs are used in all positions, up down, and across both ways and cutting will be much more difficult!
Below is the layout, sizes for the logs will refer to the letters in the layout. This log cabin, as many, starts in the middle. Press all seams open.

Lay all your strips out in this pattern! You will not layout dark to dark except with the 1 ½” squares(H) and (Dk G) strips which are surrounding the L 1 ½” square and the Dk 1 ½” squares are completing a dark line, creating the knot pattern in the upper right.


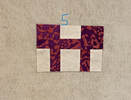
This is numbers 1 -7 which makes this a 4 ½” a square! And yes I had to trim this!

Here you can see my strip # 26 partially sewn to the right side of strip #’s 21-25. I stopped sewing across from the top of strip 20, back stitching at that point. I called that area #30, but there is no strip for it, just a line indicating where to stop sewing. Then I sewed strip # 27 to the top of the block, then # 28 to the left side and lastly 29 to the bottom. Now all you have to do is finish the seam of strip # 26 down thru #30 on the right side of the block, starting a little further up than you initially stopped, with backs stitching at the beginning just above your previous back stitching and again at the end of the seam.
Yay! -Your block is now done!
Yay! -Your block is now done!
MAY 2024
MOTHER'S CHOICE BlocK

Click image to open PDF instruction
12.5” unfinished, Using 3 colors.
Cut 4 – 2 ½” Squares from Background Fabric.
Cut 12 – 2 7/8” Squares from Background Fabric, subcut diagonally once.
Cut one 4 ½” square from each of the two focal pattern fabric colors
Cut 8 - 2 7/8” squares from each of the two focal pattern fabric colors, subcut diagonally once.
The patterned fabric in the above picture is my Background fabric. Stack your 4 Background Squares together and all of your Background Fabric Triangles together. Be careful choosing patterns, you don’t want something too directional because the pattern may be upside down or sideways, when cut into triangles and sewn into a HST (Half Square Triangle). Please note that in order to get accurate cuts when cutting and/or trimming your fabrics, it will help to have non-slip or TrueGrips non-slip rings (the holes work too) on the back of them, enough so that when you are pressing down on the ruler and running your rotary cutter down the sides of the ruler, the ruler doesn’t slip! If you don’t have any, check with your local quilting shop or order online, look for “TrueGrips for rulers” but make sure they are Transparent! Also remember that every time you sew a ¼” seam between two blocks you lose ½” in length compared to the measurement of the same blocks unsewn!
1. Put one Pink Triangle right sides together with one Green Triangle, matching the points of the 90 degree angle. Sew your ¼” inch seam down the long edge. Press the seam open. Repeat for a total of 4 HST’s. Take your 2 1/2” or larger square quilting ruler and place the 45 degree angle on the seam line of your HST. Make sure you have 2 ½ inches of fabric under the ruler on all four sides, while keeping the 45 degree angle on the seam, trim excess on all four sides, it shouldn’t be much! Press open, and set aside into a stack. Note: I don’t know about you but I’m not perfect, which is why I have you line up at the 90 degree point before sewing your seam. I have my fabric usually doubled when I cut multiple sub blocks of fabric, and even with non-slip rulers and true grips, your fabric can slip some. Your need at least one 1/8” seam allowance, and lining up at the 90 degree point gives you the best chance of getting it on both ends of the long edge seam points. See below for examples.

2. Next put one Pink Triangle right sides together with one Background triangle, matching points at the 90 degree angle, sew your ¼” seam down the long edge. Repeat for a total of 12 HST’s. Press seams open and Trim as in step #1. Place in a stack.
3. Now put one Green Triangle right sides together with one Background Triangle, matching points at the 90 degree angle, sew your ¼” seam down the long edge.
3. Now put one Green Triangle right sides together with one Background Triangle, matching points at the 90 degree angle, sew your ¼” seam down the long edge.

4. Now we need to layout our sub blocks into the right pattern to sew together the rows refer to the pictures above. Take your 4 background squares and put them into the 4 corners, then start putting in your HST triangles into the rows. Don’t forget the 4 ½” square in the middle of row 3 & 4. I find it’s less hassle to line up and match points, if I’m sewing together approximately the same size pieces. All sewn HST’s and the individual HST blocks are 2 ½” Squares. Knowing that, I worked across the first row matching every two blocks right side together, pressed seams open, and returned them to the layout, ending up with three sub blocks back in place. Then I sewed the three two-unit sub blocks together to form the first row. Press seams open, and returned right side up to the layout.
5. Repeat the same process for row 2. Lastly flip row one down right sides together onto row 2, sew your seam across the top matching points, I put an ultra thin pin (because I can sew over them) into each point and at the beginning and end of the row at approximately ¼” in. Press the seam open, putting a drop of water at each point to flatten it, and return to layout right side up.
6. For rows 3 & 4 your 2 ½” blocks are surrounding the center 4 ½” square, therefore you sew the first two sub blocks of both rows together first and place them back into position, then sew the last two sub blocks together and place them back into position right side up. Now take the 1st sub block of row 3 and flip it right side down on the 1st sub block of row 4. Sew your ¼” seam across the top matching points, press the seams open using a drop of water on the points to flatten the seam. Place back in the layout. Then repeat with the last two subblocks for row 3 & 4, placing them back into the layout. Now still working on the center section, all right sides up, flip your new combined subblock on the left over onto the center 4 ½” square, sew your seam on the left side, press open and return to layout then flip the right sub block over right side down onto the center 4 ½” block and sew your seam down the right side.
7. Rows five and six are sewn together the same as step 4.
8. Now we have three rows to work with. Flip row one, right side down, onto row two, and matching points pin and sew and seam across the top. Press open, don’t forget the water drops on seam points, and place back in layout. Now we are down to two rows.
9. Take the last row flip it, right side down, up onto the bottom of the first row. Match points and pin, sewn your last seam across the bottom, press open and you are done!
April 2024
FOOL's PUZZLE BlocK

Click image to open PDF instruction
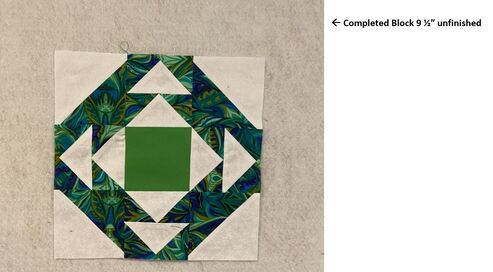
9 ½” unfinished
Cut 2 squares @ 5 ¾” and subcut diagonally twice for a total of 8 triangles of any color solid fabric.
Cut 1, or more if using directional printed fabrics, squares @ 5 ¾”. Subcut diagonally twice.
Cut 4 squares, or more if using directional fabric, @ 3 1/8”. Subcut diagonally once.
Cut 2 squares @ 5 ¾” and subcut diagonally twice for a total of 8 triangles of any color solid fabric.
Cut 1, or more if using directional printed fabrics, squares @ 5 ¾”. Subcut diagonally twice.
Cut 4 squares, or more if using directional fabric, @ 3 1/8”. Subcut diagonally once.


Now work on the right side column. It is worked the same as the left column but the triangles end up facing in the opposite direction when replaced back into the layout. The directions are the same as for the left side above, but when placing back into the layout, the solid triangles should point to the right edge of the block.
Next let’s work on the center column of which you can see most of to the
<-- left, You will be making two flying geese blocks (top and bottom) and the four triangle center square. There are four solid triangles: The top and bottom are used in the flying geese blocks. The left and right solid triangles are used in the 4 triangle center square along with the 2 large printed triangles.
Grab the top solid block and finger crease the two sides by matching your long edge point to the 90 degree point, one side at a time. Then get one of the small printed triangles next to the solid triangle and put the two long edge points together and finger press in the center of the long edge. Flip the Printed triangle down onto the side of the solid triangle and match and pin at the two crease points. Then pin again about ¼” from the edges. The printed fabric long edges should be longer than the side of the solid triangle, so that we have our ¼” wide seam allowance down the sewing edge. Sew the seam, press open. Next grab the other small printed triangle and attach to the other side of the solid triangle using the same instructions as above.
Press seam open, trim dog ears, replace resulting block back into the layout.
Do the same for the bottom flying geese!
Now let’s work on the center 4-part triangle square. For this section DO NOT OFFSET your points!
Grab the left solid triangle and flip it over onto the top printed triangle right side up, sew a ¼” seam down the left side of the resulting sandwich, 90 degree angle should be angling down and long edge should be across top; both points should meet on this, 90 degree to 90 degree and long edge point to long edge point. Press seam open, trim dog ears, and replace in layout. Repeat this with the other 2 large triangles, flipping the printed triangle right side down, onto the solid triangle on the center right. Match those points and sew down the left side seam. Press seam open, trim dog ears, and place in layout. Now take the top 2-part triangle and flip it right side down onto the bottom 2-part triangle. Pin in the center of the seams. Then match the outer edge points and pin ¼” from the edges and again between the edge point and center seam point on both sides. Sew seam, press open, trim dog ears. Place back in layout.
Now you need to attach the top flying geese to the top of the 4-part triangle. Finger press the center of the solid triangle on the long edge. Finger press the center of the top Printed triangle on the 4–part center square. Flip top flying geese down right side down on the top of the 4-part center square and match the creases and pin. Then pin close to either end. Sew your ¼’ seam, press seams open, using water drops in the thicker points of the seam and steaming them down. Next attach the bottom flying geese block following the same procedure.
Now attach the left column to the center column, pinning seam points. Again press seams open, using water drops at thick seam points. Then attach the right side column to the Center column, doing the same Thing. |This is not real hard, but it takes a little getting used to working on side seams. However, it does cause less stretching then working on the long edge of triangle.
March 2024
CUPS & SauceRS BlocK

Click image to open PDF instruction

9 ½” unfinished
From colored Fabric:
Cut 1 – 3 ½” square.
Cut 2 – 3 7/8” squares, subcut diagonally once.
Cut 8 – 2 3/8” squares, subcut diagonally once.
From Background Fabric:
Cut 2 – 4 ¼” square, subcut diagonally twice
Cut 2 – 3 7/8” squares, subcut diagonally once.
The original block I based this on, had all colored blocks out of the same fabric.
I decided to make my center a complimentary color to the color of the cups and sauces, seeing it as a table cloth, based on the name of the block. Make your block in your own style.
1. Based on the Center unpieced Block which was cut at 3 ½”s, all finished sub blocks will finish at 3 ½”s, so that when sewn together you will have a 9 ½” unfinished block. Set your Center Block aside for now.
2. Get your four large colored and background triangles made from the subcut 3 7/8” squares, and match one colored triangle to one background triangle, right sides together. Remember to start the alignment from the back 90 degree point, then match the two points on the long edge. Sew your ¼” seam on the long edge, repeat for all four half-square triangle squares. Press your seams open, Trim using a 3 ½” or larger square ruler, placing the ruler’s 45 degree diagonal line on the seam line, all the rest of the block should be within the 3 ½” marks on the ruler, except for the dog ears. Trim the dog ears and excess fabric. Note from the picture above, that these will be the four corners of the finished block and all colored fabric 90 degree corners will point to the center block.

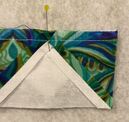
3. Making the flying geese block; Get your 8 smaller background triangles made from the two 4 ¼” squares. Make sure they are all right side up and place in a stack, get your smaller colored triangles made from the 8 - 2 3/8” colored squares, and stack them all right side up. Place one of the colored triangles, right side down, on a right side up background triangle as seen in the picture below, align along the bottom edge of the background triangle, making the long edge of the colored triangle align along the left side of the background triangle. The bottom point should meet at bottom left of the background triangle. The right side of the colored triangle will be past the center of the background triangle.
Now we will line up the other side of the block by positioning the colored block to the right side of the background block, sew your ¼” seam, and Press open. See below;
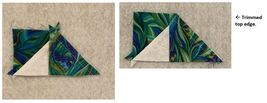
Right side positioned, note it is overlapping the left side, creating our ¼” seam allowance, and sew your seam. Next trim along the top edge of the colored fabric removing top dog ears.
Right side positioned, note it is overlapping the left side, creating our ¼” seam allowance, and sew your seam. Next trim along the top edge of the colored fabric removing top dog ears.
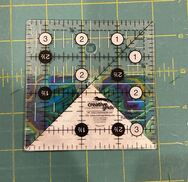
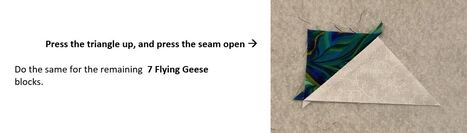
Then press triangle up, and seam open. Now see below for checking and sizing our finished Flying Geese Block, and trimming dog ears and excess fabric. This is a 3 ½” Creative Grids Square ruler! Use this size or larger. Note the 45 degree line on the ruler runs along one side of the block seams and the block corners are all within the ruler size. This block is 2” X 3 ½”s.
Also note the little white circle in the center of the ruler, this is where the point of the large white triangle is, so our block is centered. Next note that the colored portion on the top of our block is 1/4” inch above that white colored triangle point and the white line going across, giving us our ¼” seam allowance on the top of the block point.
There are many sizes of this ruler available for various sizes of blocks. I use the 2 ½ through the 4 ½ the most, it just makes sizing blocks so much easier! These are usually less expensive and I snatch them up when I can. Trim blocks as needed. Now make the remaining 7 Flying geese triangles.

4. Your finished Flying Geese sub-block requires that we sew two Flying Geese Blocks together. Lets get started! Both Flying Geese need to point in the same direction, so place two Flying Geese Blocks, right side up, one above the over as below;
Next flip the top one down right side down onto the bottom unit. Place a pin right through the top point of the white triangle point from the back side, making sure that the two block as aligned at the edges as well. Sew your seam. It should look like below;
Press seams open! Now we need to check it for size and trim if needed, it should be 3 ½” square!
Finish the other three 2-Flying Geese sub-blocks the same way.
Now we need to size and trim our 3 ½” Double Flying Geese blocks. Using the same 3 ½” ruler, you can see the 45 degree line goes down one side of one of the background triangle seam lines and the whole block fits within the ruler. Ideally the white line going down center would go through the top point of the top Flying Geese block as well as the bottom center point. I had to take my finger and just pull up and out, on the right side a tad while making sure the bottom right corner was still in the ruler, then all was well.
Finish the other three Double Flying Geese blocks the same way!
Now we can put our sub-blocks into columns.
5. Lay out your sub blocks. Put your center 3 ½” square in the center, Leaving 3 ½” – 4 “s above and on both sides and below. Then take your 4 – HST blocks and place one in each corner with the 90 degree points of the colored HST triangle block touching the 4 corners of the center block. Lastly take your 4 double Flying Geese Blocks with white triangle points pointing out from the center block in all four directions, and place them between all four corner blocks.
6. Lets sew the Left column together. You have a HST triangle block on top, color point down, then a Double Flying Geese Block pointing out to the left, and lastly another HST triangle block on the bottom with the color point up. Flip the top HST triangle block down on top of the Double Flying Geese block and line up the top edges, pin through the side of the open middle seam of the 2 Flying geese blocks that will go under the needle first. Make sure the two edges meet as well. Sew your ¼” seam. Press seam open. Place the resulting block right side up above the remaining block from the left column. Flip that bottom remaining HST right side down onto the double flying geese block and line up on the bottom edges, pin through that side seam that will go under the needle first, again make sure the whole bottom edge is good, then sew your ¼” seam and press open.
<--Left side Column blocks
<--Left side Column blocks

7. Now lets work on the center column. You have a double Flying Geese square on top points up, the center colored square in the middle, and another Double Flying Geese square on the bottom that points down, all right side up.
Take the top Flying Geese square and flip it down on top of the center colored square. Line up the top and side edges, place a thin pin in the center at least, then sew your ¼” seam, across the top. Press seam open. Place back above your remaining Flying Geese block, and flip the bottom Flying Geese block up, so both are right sides together. Again line up the bottom and side edges, pin in the center, and sew your ¼” seam across the bottom. Press seams open. Check your column on both sides for 3 ½”s and trim excess, so that it is now 3 1/2” X X 9 ½”s.
<-- Sewn Center Column
8. Next we will sew the center column to the left column. Place them right side up, center column on the right. Flip the left column over, right side down, onto the center column. You will need to pin down the left side of the quilt block sandwich, with ultra thin pins, at the 4 side points of the Flying Geese. I place my pins right through those points and aim for the pin while seaming, adjusting my seam to meet the points. Also pin in the middle of the center block and about a ¼” from either end of the column. Sew your ¼” seam down the left side of the quilt block sandwich. Press seam open, see below;
- <-- Left side and center column sewn together.
Lastly we need to sew the right side column together and then sew it to the other two columns. Line up your right side column blocks as these, right side up. Flip the top HST block right side down on top of the Double Flying Geese Block.
<-- Right side column blocks
Line up these top edges and place a pin at the point of the right side Flying Geese edge, to match that point. Sew your ¼” seam. Press open and place the resulting block above the remaining bottom HST block.
Again flip the bottom HST triangle block right side down on top of the Double Flying Geese Block. Line up the bottom edge matching that bottom point of the right side Flying Geese block and pin. Sew your ¼” seam. Press seam open.
Now attach this right side column to the right side of the middle column, as you did the other two columns above in step 8. Pin, matching points and the open side of the seam that will go under the needle first. Sew your ¼” seam, press open.
FEbruary 2024
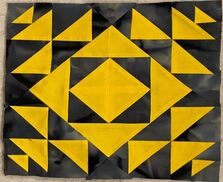
True lover's Knot BlocK
Click image to open PDF instruction
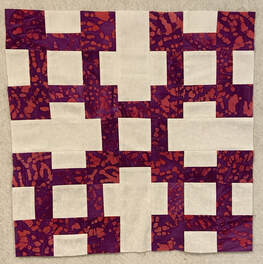
14 ½” unfinished
Colored Fabric requirements;
16 – 2 ½” squares.
20 – 1 ½” X 2 ½” rectangles.
Background Fabric requirements;
4 – 2 ½” X 5 ½” strips.
5 – 2 ½” squares.
16 – 1 ½” X 2 ½” rectangles.
All seams are ¼”. Directions are not given for directional fabrics.
WOF: width of Fabric.
You can either cut the rectangles by cutting a WOF strip at 1 ½” from both fabric, sewing them together, and then sub-cutting at 2 ½” lengths or cutting strips at 2 ½” and then sub-cutting the different lengths you need, then sewing it together, this is what I did because all the different requirements had 2 ½” inch for at least one of the sides! Lets Go – This is an easy one!
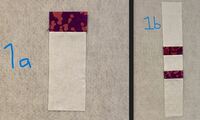
1. Take your 4 - 2 ½” X 5 ½” strips of Background Fabric and sew 1 – 1 ½” X 2 ½” rectangle of Colored Fabric on one end of each piece, right sides together. Press seams open. Set two of these aside, we will call these side pieces unit 1a. Now take one of the two remaining strips and sew 1 - 2 ½” Background square right sides together to the Colored Fabric end of the strip. Press seam open. Next take the remaining strip and sew it, Colored Fabric end to the opposite end of the 2 ½” square of Background Fabric, right side together! Press seam open. We will call this unit 1b, it will be the center column of the finished block. Set this aside with the other unit 1a pieces.
Colored Fabric requirements;
16 – 2 ½” squares.
20 – 1 ½” X 2 ½” rectangles.
Background Fabric requirements;
4 – 2 ½” X 5 ½” strips.
5 – 2 ½” squares.
16 – 1 ½” X 2 ½” rectangles.
All seams are ¼”. Directions are not given for directional fabrics.
WOF: width of Fabric.
You can either cut the rectangles by cutting a WOF strip at 1 ½” from both fabric, sewing them together, and then sub-cutting at 2 ½” lengths or cutting strips at 2 ½” and then sub-cutting the different lengths you need, then sewing it together, this is what I did because all the different requirements had 2 ½” inch for at least one of the sides! Lets Go – This is an easy one!
1. Take your 4 - 2 ½” X 5 ½” strips of Background Fabric and sew 1 – 1 ½” X 2 ½” rectangle of Colored Fabric on one end of each piece, right sides together. Press seams open. Set two of these aside, we will call these side pieces unit 1a. Now take one of the two remaining strips and sew 1 - 2 ½” Background square right sides together to the Colored Fabric end of the strip. Press seam open. Next take the remaining strip and sew it, Colored Fabric end to the opposite end of the 2 ½” square of Background Fabric, right side together! Press seam open. We will call this unit 1b, it will be the center column of the finished block. Set this aside with the other unit 1a pieces.
2. Now take the remaining 32 - 1 ½” X 2 ½” strips, there should be 16 of both Colored and Background Fabrics, and sew 1 of each color, right sides together, down the length of the rectangle, piecing until you have combined all 16 pairs! Cut them apart, press seams open. These now measure 2 ½ “ square, we will call them unit 2.

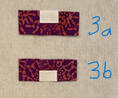
3. Now get 8 of the Colored Fabric squares and sew them to 8 of the unit 2 squares, so that both colors meet the Colored square, right sides together. Press seams open. Next get the other 8 Colored Fabric squares, and sew one each, to the other end of the unit 2 squares, right sides together. Press seam open, then stack four of these with Background Fabric facing up, Unit 3a, and the other four with Background Fabric facing down, Unit 3b. Set them aside for now.
4. Next get your 4 remaining Background 2 ½” squares and four of the remaining unit 2 squares, and sew them right sides together so that Colored (C) side of the unit 2 square is next to the Background (B) square. Press seams open, then get the last 4 unit 2 squares and sew them colored side to the opposite side of the Background square, so that this unit will be B/C/B/C/B. Press seam open, Lay these out with space above each one. These are unit 4.

5. Now get your unit 3a pieces right side up and place these above your unit 4 pieces right side up, fold the unit 3a down right sides together on top of each unit 4. Line up across the top, pinning with ultra-thin pins, matching seam points, the ends of the pieces ¼” in from the end and any open seam sides that are going under the presser foot first, that would be 6 pins. Do this for all 4 sections. Sew seams, remove pins and press open. These are now unit 5.
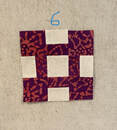
6. Now spread your unit 5 pieces out, right sides up, leaving space underneath them. Get your unit 3b pieces and place them right side up below your unit 5 pieces. Then fold your unit 3b up right sides together on to the bottom of unit 5. Pin along the bottom with ultra-thin pins, matching seam points, the ends of the pieces ¼” in from the end and any open seam sides that are going under the presser foot first, that would be 6 pins. Note that the middle background square is now surrounded by color pieces. Do this for all 4 sections. Sew seams, remove pins and press open. These are now unit 6. You now have 4 unit 6 pieces.
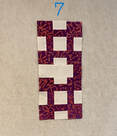
7. Take 2 of the unit 6 pieces right side up and place a unit 1a piece between them right side up, with the Colored piece on the right side. Flip the unit 1a up right sides together lining up along the bottom of the unit 6 piece. Sew the Unit 1a to the bottom of the top unit 6 piece right sides together, pinning as before across the bottom of the two pieces. Press seam open, and then, flip the bottom unit 6 piece, right side together on top of the unit 1a piece lining up across the bottom of the two pieces. Pin as before. Sew your seam. Press seam open. Now do the same with the other 2 unit 6 pieces only this time face the color section of the unit 1a to the left side of the unit 6 sections. These are Unit 7. Leave them right side up with space between them.
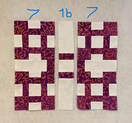
8. Lastly retrieve your Unit 1b center column piece and place it between your two unit 7 pieces. Lining up so that Color Fabric surrounds the center 2 ½” Background square. Pin as before, sew your seam, Press seam open. You are done!
JANUARY 2024
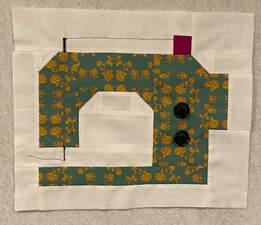
sew & sew BLOCK
Click image to open PDF instruction
10 ½” X 12 ½” unfinished
Cutting Directions
Background Fabric;
Cut 1 strip each at 2 ½” X 8 ½”, 2 ½” X 3 ½”.
Cut 2 strips at 2 ½” X 4 ½”.
Cut 1 strip each at 1 ½” X 9 ½”, 1 ½” X 7 ½”,
1 ½” X 5 ½”, 1 ½” X 3 ½”.
Cut 3 strips at 1 ½” X 2 ½”.
Cut 1 square at 1 ½”.
Cut 2 squares at 1 7/8”, cut diagonally once.
Thread Fabric; Also need matching color thread for this! Cut 1 square at 1 ½”.
Machine Fabric;
Cut 1 piece at 3 ½” X 5 ½”.
Cut 2 pieces at 2 ½” X 4 ½”.
Cut 1 piece each at 1 ½” X 9 ½”, 1 ½” X 3 ½”, 1 ½” X 2 ½”, and 1 ½” square.
Cut 2 squares at 1 7/8”, cut diagonally once.
Let’s get started! All seams are ¼”. Pin match points. I pin the pressed open seam side that will be sewn first.
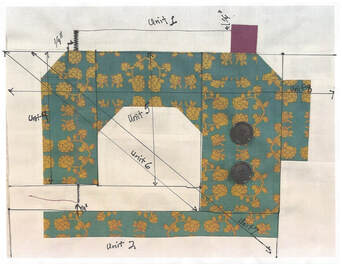
Below is a larger picture with indications of what is in each unit for reference.
Cutting Directions
Background Fabric;
Cut 1 strip each at 2 ½” X 8 ½”, 2 ½” X 3 ½”.
Cut 2 strips at 2 ½” X 4 ½”.
Cut 1 strip each at 1 ½” X 9 ½”, 1 ½” X 7 ½”,
1 ½” X 5 ½”, 1 ½” X 3 ½”.
Cut 3 strips at 1 ½” X 2 ½”.
Cut 1 square at 1 ½”.
Cut 2 squares at 1 7/8”, cut diagonally once.
Thread Fabric; Also need matching color thread for this! Cut 1 square at 1 ½”.
Machine Fabric;
Cut 1 piece at 3 ½” X 5 ½”.
Cut 2 pieces at 2 ½” X 4 ½”.
Cut 1 piece each at 1 ½” X 9 ½”, 1 ½” X 3 ½”, 1 ½” X 2 ½”, and 1 ½” square.
Cut 2 squares at 1 7/8”, cut diagonally once.
Let’s get started! All seams are ¼”. Pin match points. I pin the pressed open seam side that will be sewn first.
- Sew the 1 ½” Background square to the top of the 1 ½” Thread Fabric square, right sides together. Press seams open. Next sew that unit, Thread fabric square down, right sides together, to the end of the Background Fabric that’s 2 ½” X 8 ½”. Press seam open. Then sew the Background Fabric rectangle at 2 ½” X 3 ½” right sides together to the right side of the Background and Thread unit. Press seam open. This is the top row of the block, it’s the only one we can sew all the way across, without putting multiple units together! This is unit 1. Set aside.
- Next lets sew both the Background and Machine Fabric strips at 1 ½” X 9 ½” right side together, Machine Fabric on top, down the length, so that when finished it will be 2 ½” X 9 ½”s. Press seam open. Now take one of the Background strips at 1 ½” X 2 ½” and sew it to the left side of the 2 ½” X 9 ½” unit we just made. Press seams open. This is unit 2. Set aside.
- Now take the triangles you cut from the Background and Machine Fabric squares at 1 7/8”s, and sew one of each together until you have four Half Square Triangle (HST) units. Remember to line them up first at the 90 degree point, then down the sides, sew along the long edge of the triangle. Press seams open. Trim to 1 ½”. Set them aside.
- Take one of the HST blocks matching the Machine Fabric to the Machine Fabric of the 1 ½” square, right sides together and sew them together down the side where the Machine Fabrics meet, as on the top left of the Sewing Machine in the picture. Press seams open. Then place this unit right side down on the top of one of the 2 ½” X 4 ½” Machine Fabric rectangles set on end, and sew the seam across the top. Press seam open. Lastly take the 1 ½” X 5 ½” Background strip and put it right side down on the left side of the unit we are working on sew down the side. The Background triangle should meet the Background strip on the left side, Press seam open. Set aside. This is unit 4.
- Now get two of the HST squares and put one on each side of a Background strip at 1 ½” X 2 ½”, Background Fabric to Background Fabric at both ends. Press Seams open after sewing each end. This is now a 1 ½” X 4 ½” strip. Place it right side down on top of one of the Background strips at 2 ½” X 4 ½”. Sew across the top of the 4 ½” length. Press seam open. Now get the remaining Machine strip at 2 ½” X 4 ½” and place it right side down on top of the double HST unit and sew across the 4 ½” length. Press seams open. This is unit 5.
- Next sew unit 5 to the right side of unit 4, match points by pinning the top half of the open seam in the direction you are going. Press seams open. Lastly take the Background strip at 1 ½” X 7 ½” and sew it to the bottom of this new combined unit. Press seam open and set aside. This is now unit 6.
- Now take the remaining Machine strip 1 ½” X 2 ½” and the remaining HST unit and sew them, Half Square Triangle on the right, right sides together, Machine color to Machine color. Press seam open. Next get the Machine Fabric rectangle at 3 ½” X 5 ½” and place it on end right side up. Place the Machine strip and HST unit on top, with the HST on the right and flip it down right sides together on top of the rectangle, sew your seam across the top as usual. Match points. Press open. Next sew this unit to the right side of unit 6. Lastly Take the unit 2 and sew it to the bottom of this newly combined unit right sides together, with the background fabric on the left side and bottom and the machine fabric on the right and top of the bottom unit. This is unit 7.
- Next get the Machine strip 1 ½” X 3 ½” and place it right sides together with the 1 ½” X 3 ½” Background Fabric strip and sew down the length of the strips. Press seam open. Then take the last 1 ½” X 2 ½” Background strip and place it right side down across the top end of the two strips we just sewed together and sew across the top, Press open. Place the last Background strip at 2 ½” X 3 ½”, end to end right sides together, on top of this new combined unit with the Machine Fabric to the left and Background Fabric to the right side. Sew the bottom seam. Press open. Now take this 4 piece unit and sew it right side together to the right side of unit 7. Lastly Get unit 1 from step 1 and sew it right sides together on top of unit 8.
- Now find your matching thread to the color of your Thread Fabric block and thread your machine. Sew from ¼” down the left side of the thread block across to ¼” in from the left side of the Machine Fabric 1” square on the left side of the block, pivot and sew down to the background strip just above the bottom of the sewing machine, continue down to ¼” above the bottom of that background strip. Pivot and sew a wavy line like loose thread trailing from the needle. Next rethread with black then sew a zigzag over the thread starting at the pivot point on top left of the Machine 1” square block to the seam line, to cover over the thread, about ¼” wide. Then do the same, but with a smaller zigzag, so you just cover the thread from the bottom of the front of the machine with a smaller zigzag, representing the needle, just to the pivot point where you trail the thread off. Lastly sew two buttons, representing the dials on sewing machines, to the 3 ½” X 5 ½” Machine Fabric rectangle block at the back of the sewing machine. You are done!
Below is a larger picture with indications of what is in each unit for reference.
DECEMBER 2023
TWINKLING WREATH BLOCK

Click image to open PDF instruction

This blocks’ instructions includes one template (please download the PDF for proper printing of the template)
12 ½” unfinished
This block came from a twinkling star block pattern which I thought looked more like a wreath, so that’s what I did with it just by changing the colors in the block.
You may use whatever colors you want in your blocks, because, well, they are your blocks, but my instruction will refer to my colors in my block so that you can follow along to make the block. Read once through before starting on the block!
Cut 2 squares at 4 3/8” of white, magenta, and purple fabrics, sub-cut all once diagonally.
Cut 4 additional squares at 2 3/8” of purple fabric.
Cut 8 squares at 2 5/8” of your green wreath fabric, sub-cut all once diagonally.
Cut 1 square at 5 ½” of your green wreath fabric. (The size of this needs to be correct. Measure it after you cut it!)
Cut 4 squares at 2 1/2" of your yellow and blue fabrics.
We are going to work on the three sections of this block separately; center block, 4 yellow block corners, and 4 middle rectangles and then put them together, into 3 columns, and lastly sewing those together. Refer to the picture!
1) First we are going to “snowball” the 5 ½” green square, using the 4 squares we cut from the purple fabric. Place one of the purple 2“ squares in any corner of the big 5 ½” green square right sides together, sew across the inner corners of the purple block. Do the same with the remaining purple squares, in the remaining corners of the green square. Now trim the corners off the big square ¼” in, from the seams you just made, then fold the purple triangle up and press the seams open. You still have a 5 ½” square, but it now has purple corners! This is the center block, set it aside for now.
2) Next we are going the make the four corners of the overall block. Take 1 of the green wreath triangles and place it right side down on 1 of the yellow squares, line up the side edge 90 degree point of the green triangle even with one of the 90 degree points, forming a straight line across the green triangle and down the side of the yellow square. Sew a ¼” seam down that side edge. Do the same to the other 3 yellow squares, then take all and press the seams open and trim the dog ears that stick out past the yellow square. Then turn them over to right side up again and take 3 more of the green triangles and match them to the adjoining side of the yellow square, where we trimmed the dog ear off, but line up on the opposite 90 degree point of the yellow square, so that both long edges of the green triangles are facing in the same direction. Sew down from the back 90 degree point down to the long edge of the green triangle in the front. Press the seams open and trim the resulting dog ear. The green triangles should have overlapped each other giving you a ¼” inch seam allowance on the new long edge of this 3 part triangle. Take your new larger 3 part triangles right side up and using a ruler, make sure you have a ¼” seam allowance above where the green triangle points overlapped the yellow square corner. I take the two outside points of the green triangles and make sure they are 1/4” above the edge of the yellow square as well and then trim any excess green fabric on that long edge. You usually are just trimming excess in the center of the long edge of the 3 part triangle. Now take one of the white triangles and place it right side down on the 3 part triangle, line up the back 90 degree corner of the yellow square to the back 90 degree point of the white triangle, then flip it over and pin at the front corner of the yellow square right through the seam point where the two green triangles crossed over the yellow square, then pin the two outside corners of the green fabric points to the outside corners of the white fabric about a ¼" down from the end points, all with ultra thin pins and I sew my ¼" seam right through those points. Press seams open. Trim to 4 ¼" square, lining up your 45 degree angle of your ruler down the seam you just made. Your four corner units are now done. Set aside.
3) Now we will tackle the 4 middle units. We again start with making a 3 part triangle, but this time with the 4 blue squares and the remaining 8 green triangles, make these exactly as you did for the yellow 3 part triangles in step 2.
Set aside momentarily, while we use the template below to trim our purple triangles. Place the long edge of your purple triangle down, and line up the straight of grain side of the template on the left side of the purple triangle, with 90 degree corner at the end of template with the straight of grain marking on it, lined up at the 90 degree corner of the purple triangle, not on the long edge (which is the bias edge). You will trim off the dog ear of the purple triangle on the left end of the long edge and a chunk forming a small triangle from the other end of the long edge of the purple triangle. You will not use this small purple trimmed off triangle. Next retrieve your blue three part triangle and place it right side up, long edge to the left, place trimmed purple triangle piece, right side down, on the bottom side edge of the blue 3 part triangle, and match that back corner of the trimmed purple piece to the back corner of the blue 3 part triangle so the back ends of both pieces are even and pin with the ultra thin pins through the center seam of the 3 part blue triangle and two opposite ends of that side and sew your seam. Press open and trim. Next take one of your magenta triangles and place it right side down, lining up the long edge of the magenta triangle down the other side of the 3 part blue triangle and continue down, ending up even to the end where we cut the small triangle off the purple trimmed triangle. Sew your ¼" seam. Press seam open. Trim this unit to 4 ¼" X 5 ½". Do the same with the other 3 part blue triangle units, and remaining purple and magenta triangles. Your have now made the 4 side center units.
Note: the two long edges are 4”s, and the two short edges are 1 ¾”s. 90 degree angle is at the top right straight of grain edge on this template. Make sure you print this at “actual size”!
4)Next we put the sub blocks together. Take one of the side center rectangle units and place it right side up, with the 3 part blue triangle to the left side of the rectangle and then get one of the 3 part yellow triangle corner units and place it right side down on top of the magenta triangle in the side center unit, Yellow square to the right side of the magenta triangle, pin points, and sew your ¼" seam, Press seam open. Turn right side up again with purple piece on the bottom, then take another 3 part yellow square triangle corner unit and place it right side up yellow square on right side, below the purple bottom of the center rectangle, flip it up, right sides together lining up the right edge of the blue square even with the right edge of the purple trimmed piece of the center rectangle unit. Pin points along the bottom edge and sew seam. Press seam open. Repeat once for 2 completed side column units. Check against picture. Set aside.
5)Now retrieve your center snowballed square right side up. Place one of the 2 remaining center rectangle units right side up above the snowballed center square, with the purple triangle to the left side and the magenta triangle to the right side of the top of the snowballed center square. Flip the center rectangle unit right side down onto the snowball unit and pin along the top matching points making sure they match up at the seam points, especially of the purple pieces, thus completing the purple triangle again. Remember the seams should match not at the edge but at the ¼” seam points of the unit. Do the same with the last side center rectangle but lining up on the bottom of the snowballed center square, this time with the magenta piece on the left and the purple piece on the right, and the blue 3 part triangle’s long edge down. Again pin along the points making sure they match up at the ¼” seam points of the purple pieces, thus completing the purple triangle again. You have now completed the center column of the block.
6)Now we sew the three columns together. Take one of the of the step 4 side column units and place it right side up to the left of the completed center column unit from step 5, right side up. Both Yellow squares in the side column should be on the right side of the side column unit and next to the left side of the Center column unit. Flip the side column unit onto the center column unit, Pin points making sure your purple points meet at the seam line, and sew your ¼” seam down the left side. Press seam open. Place unit right side up. Lastly get your second side unit and flip it around so that it is right side up with the yellow squares next to the right side of the center column, and the 3 part blue triangle in the middle faces long edge out. Flip it over right side down onto the center column and this time match points down that right side edge and sew your seam. Press open. You should be done!
November 2023
LIGHT HOUSE BLock
Click image to open PDF instruction
10 ½ inches unfinished
This is an intermediate block
Cut 1 – 5 ¼ “ square from your Light fabric – subcut twice diagonally. This makes your Largest triangles and they are used to complete the center block. Keep the sizes separate!
Next cut 8 each – 2 7/8 “ squares from both the Background fabric and the Light fabric. Subcut all diagonally once. This makes 16 each of the next biggest triangles. They are used primarily to make 2.5” Half Square Triangle Squares (HST).
Cut 3 – 3 ¼” squares from background fabric only and subcut diagonally twice. This makes the third size triangles.
Lastly cut 2 – 1 7/8” squares from your Light fabric and 6 - 1 7/8” squares from your Background fabric. Subcut all diagonally once. This makes the Smallest triangles. All seams are ¼ “. Note that this block finishes with the center block on point, and with all corners pointing to it!
- First we are going to take all the 2 7/8” triangles and work with those. Take 4 of each color and set them aside. Next take one of each color and place them rights sides together, matching the edge at the 90 degree point, then the two other side points and sew down the long edge, If the long edge doesn’t meet exactly that isn’t as important as the 90 Degree back corner and the two sides meeting. Sew your ¼” seam down the long edge, gauging from whatever fabric sticks out most, if they don’t meet. Press seams open and trim to a 2 ½” square. Set aside. You should have 12 - 2 ½” Half square triangle squares (HST), made from the 2 7/8” triangles.
- Now take two of the HSTs you just created in step one and place them side by side, Light fabric touching, Background fabric pointing out in the exact opposite direction and sew your seam down the two Light fabrics, right sides together. Now it should look like a flying geese rectangle, with a bigger Light fabric triangle. Next take 2 more of the step one HSTs and sew them together, when done turn it around until the Light triangle in the center points down, place the block below the flying geese block you first created, both right sides up creating a Light colored fabric square in the center. Flip the top rectangle right side down onto the bottom rectangle and sew your seam along the top of the rectangles forming the Light fabric square. Press seams open and Trim to a 4 ½” square. The block now looks like a square in a square.
- Lastly take the 4 largest Light fabric triangles cut from the 5 ¼” square and finger press a short seam in the middle of the long edge by matching the two points from the long edge together on each triangle. Place one of the Light fabric triangles right side down on one side of the 4 ½” block we just made matching the finger press seam to the center seam in the middle of the side of the block we just made, and that the point of the triangle hits the seam further down the square. Sew your ¼” seam across the block. Do the same with a 2nd of the largest Light fabric triangles, place it on the opposite side of the square right side down. Press seams open. Trim dog ears. Then do the other two sides the same way. Press seams open and trim dog ears. Trim to a 6 ½” square by lining up the 45 degree diagonal line on your ruler with the seam running thru the center square of the block. The center of the Lighthouse block is done! See picture to the left.
- 4. Now on to the Corner Units! Now take your 4 smallest Light Fabric triangles from the 1 7/8” squares and match them up right sides together with 4 of the smallest Background Fabric triangles also from the 1 7/8 Squares, again lining up on the 90 degree angles first, etc. Sew your seam on the long edges. Press seams open, trim dog ears and trim resulting HSTs to 1 1/5”. See Left side top small HST, in the left side of the corner unit (see picture to the left).
- 5. Next take the 4 - 1.5” HSTs you just made in step 4 and place them in a row a couple of inches apart with the Light triangles facing to the right. Next get 4 of the 1 7/8” Background triangles and place them right side up, 90 degree angle to the top right edge of the 1 ½” HSTs. Flip the Background triangle over right side down, onto the the 1 ½” HSTs and sew your seam down the right side. Repeat on the remaining 3 1 ½” HSTs. Press seams open and trim dog ears.
- Now we are going to take the last 4 of the Background 1 7/8” triangles and attach them using the same techniques, only this time we will line up the 90 degree angle of the Background triangle up along the left side bottom edge of the 1 ½” HST, right side up. Flip the triangle up, right side down up onto the HST and sew your seam along the bottom edge of the HST. Press seam open, check your alignment against the 4 part triangle of the above top left picture, and if correct, trim dog ears. Lay them out right side up in a row with the 4 part triangles in the top left corner as in the picture above. Now take 4 of the 2 7/8” Light Fabric triangles that we set aside in step one and place them right side down on top of the 4 Part Triangles, lining up as usual on the 90 degree angle and side points. Sew your seams across the long edge. Press seam open, trim dog ears. Trim blocks to 2 ½”. You should have 4 HST blocks containing the 4 Part Triangles.
- Next get 4 of the 2.5” HSTs made from the 2 7/8” triangles in step one and sew them right sides together, one each to the bottom the of HSTs we created containing the 4 part triangles in step 6, making sure the Light Fabric triangles are facing in the same direction. This creates a rectangle that is 2 ½” X 4 ½”.
- Now take two of the second smallest Background triangles made from the 3 ¼” squares, place them right sides together, matching the 90 degree angle, and side points. Then sew seam together down one side from the 90 degree angle. Press seam open and trim dog ears. Now you’ve created a larger triangle with 2 parts. Press seams open and trim the dog ears. Then place the new 2 part Background triangle right side up below the HST we just sewed onto the bottom of the HST with the 4 part triangle, matching the right half of the the two part triangles 90 degree angle to left edge of the 2 ½” HST’s bottom edge. The right side point of the 2 part triangle should be at the right bottom edge of the same HST. Flip this 2 part triangle up onto the bottom of the rectangle and sew your ¼” seam along the bottom, press open, trim dog ears down the side of the rectangle. Make three more of these left sides of the corner units, them set aside for now, while we make the right half of our corner unit.
- Take the last 4 of the 2 ½” HSTs made in step 1, placed them right side up, in a row in front of you with the Light triangle on the bottom. Get the last 4 Background colored triangles made from the 2 7/8” squares and place them right side up below the HSTs with the 90 degree angle to the left, so that the Background triangles are facing in the same direction. This will make a longer edge on the left then the right of the unit, that’s what we want. Flip that triangle up and sew the edge to the bottom of the HST, press seam open and trim dogs ears down the sides of the unit. Now take 1 of the small background triangles and place it long edge on the right side of the 2 1/2” HST right side up. Flip the triangle over right side down onto the HST and seam the right edge. Press open and trim dog ears. You have finished the right side of a corner unit. Make 4.
- Next take one of your left side units, right side up, with the 4 part triangle square on top left, then take one of the right side units and place it right side up with the half square triangle square on top, to the right Of the left unit. All of the large Light colored triangles should be facing in the same direction! Flip the right side unit, right side down, on top of the left side unit. Sew your 1/4” seam, lining up points, square triangle down the right side so that your will have the 4 part triangle square on the top left and the HST square from the right side on the top right. Press seams open and trim dog ears. Attach the remaining left and right units together. This will complete your 4 corner units.
- Lastly retrieve your Center piece, place it right side up as a square. Now get one of the completed Corner units from step 8, fold the middle of the large Background triangle, in the middle of the bottom, in half, finger press at edge, then place it right side down, onto one side of the center block facing right side up, Lining the finger pressed middle of the middle Background triangle on the bottom edge of the corner unit up with the point in the middle of the Center Block, then line up the right edge of the corner unit with the right edge of the center unit right side. Pin matching points with ultra thin pins. Sew your ¼” seam from the right edge down to Just past the center point and stop there, back stitch and cut your thread. Note the left edge of the corner unit hangs below the edge of the center unit, that’s how it should be. Press your seams open. Now we work around the center unit. Turn the corner you just placed on the unit over to the left once, so the right edge of the center unit is now straight up. Take another corner unit, finger press the center of the bottom Background triangle and place it right side down, on the center unit, lining up same as before, but this time pin the length of the seam, it should all fit this time. Sew your ¼” seam matching points, press open. Turn the unit to the left again and do the same thing. When you get to the last corner unit after you pin it, you will fold back the 1st corner unit so that it’s not in the way before you sew the last corner on. Press the seam open. Then you can turn the first corner unit back over and finish sewing the seam from the middle, by inserting your needle just before we backstitched, stitch backwards about three stitch and then continue forwards to the left end to complete your seam. Press open again. Trim all dog ears. The finished block should be 10 ½”s.
OCTOBER 2023
Bright hope BLock
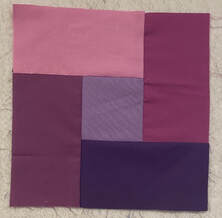
Click image to open PDF instruction
SEPTEMBER 2023
LITTLE RED SCHOOL HOUSE BLock
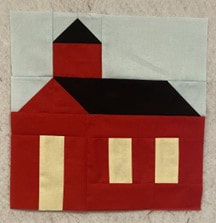
Click image to open PDF instruction
AUGUST 2023
HILL & VALLEY BLock

Click image to open PDF instruction
JULY 2023
ROLLING PINWHEEL BLock
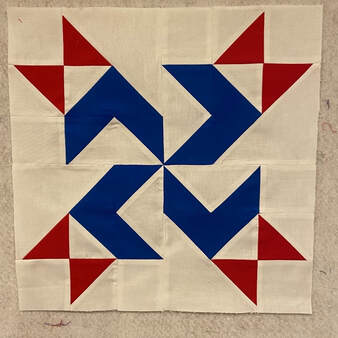
Click image to open PDF instruction
JUNE 2023
WHEEL OF FORTUNE BLock

Click image to open PDF instruction
MAY 2023
TULIP TIME BLock
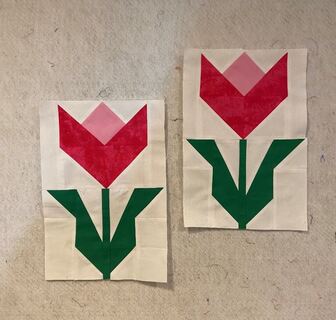
Click image to open PDF instruction
APRIL 2023
MILKY WAY BLock
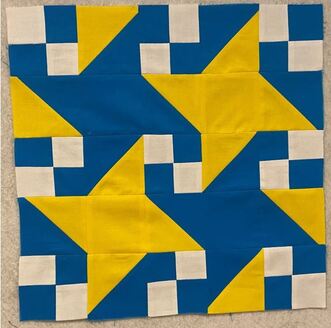
Click image to open PDF instruction
MARCH 2023
BIRDs NEST BLock
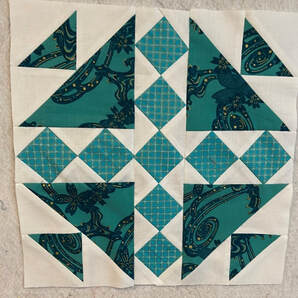
Click image to open PDF instruction
February 2023
Cherry tree BLock
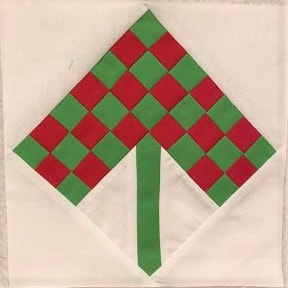
Click image to open PDF instructions
DECEMBER 2022
cardinal BLock
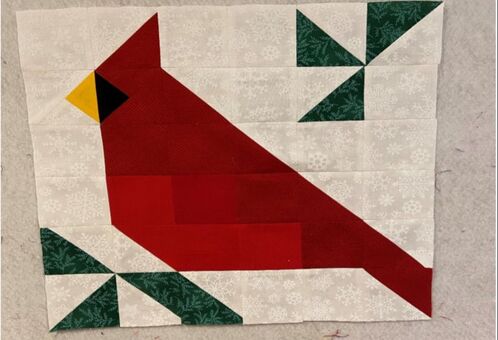
Click image to open PDF instructions
november 2022
CHRISTMAS TREE BLock

Click image to open PDF instructions
september 2022
snails trail BLock
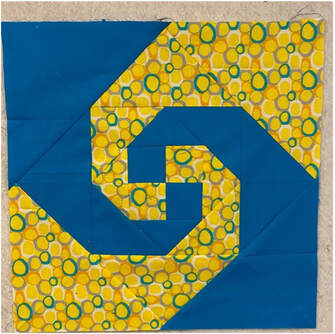
Click image to open PDF instructions
August 2022
Lady of the Lake BLock
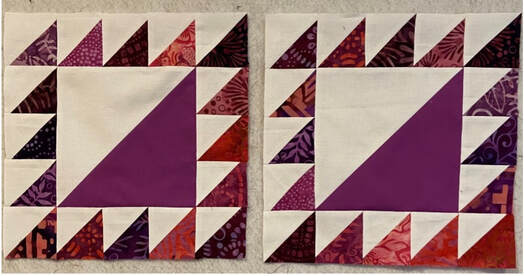
Click image to open PDF instructions
july 2022
TALL SHIP block
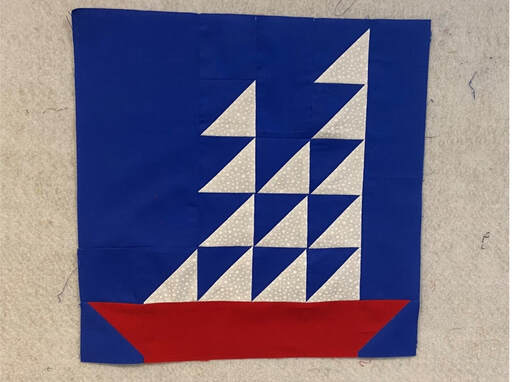
Click image to open PDF instructions
june 2022
state house block
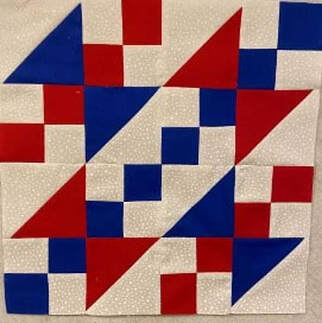
Click image to open PDF instructions
may 2022
Devil's claw block
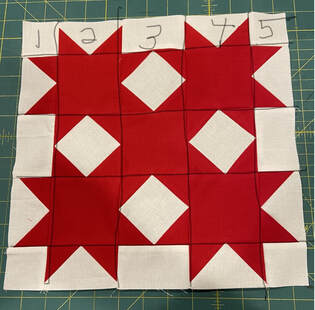
Click image to open PDF instructions
April 2022
Bird of paradise
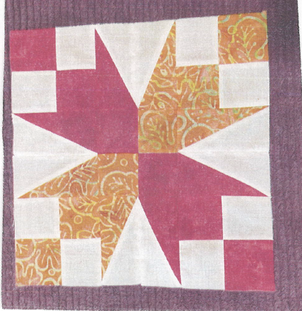
Click to open PDF instructions and template
March 2022
Double Irish chain
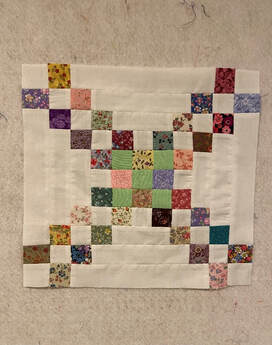
Click to open PDF instructions
February 2022
"Heart"
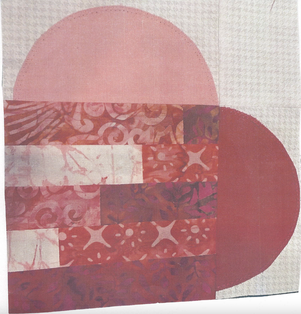
Click to open PDF Instructions & actual applique template
January 2022
"Album Patch"
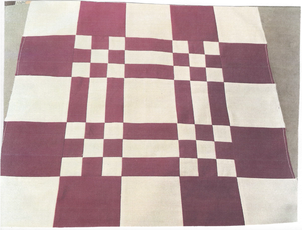
Click to open PDF instructions
december 2020
"disapearing Block"

Click to open PDF instructions
november 2020
"maple leaf"

Patterns by Marcia Hohn, www.quilterscache.com
october 2020
"Sawtooth star" or "square on points"
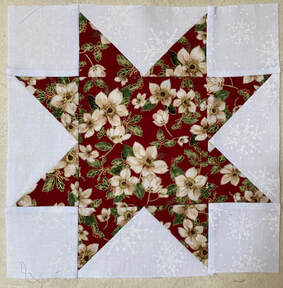
Patterns by Marcia Hohn, www.quilterscache.com
september 2020
"square in square"

Patterns by Marcia Hohn, www.quilterscache.com
august 2020
"rail fence"

Patterns by Marcia Hohn, www.quilterscache.com
june/july 2020
"july fourth - fifty-four forty or fight"
note: please use red, white/cream and blue fabric

Patterns by Marcia Hohn, www.quilterscache.com
March 2020
"ground cover"
note: please use fabric with high contrast
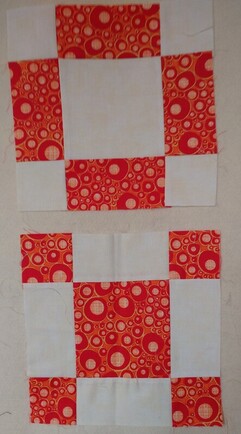
February 2020
"four leaf clover"
note: block to be done in green and white
(applique' is optional)
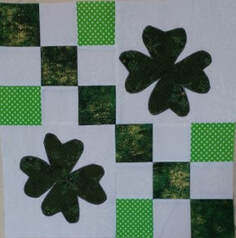
Pattern by Marcia Hohn, www.quilterscache.com
june 2019
"buzzsaw"
note: block to be done in red, white & blue
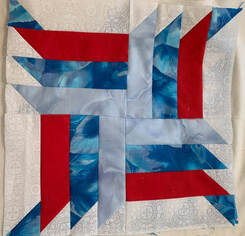
May 2019
"Flight of Swallows"
Note: Block to be done in blue & white
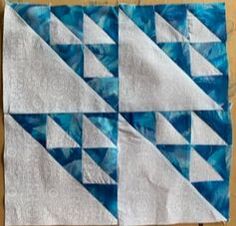
Pattern by Marica Hohn, www.quilterscache.com
April 2019
"Log Cabin Stars"
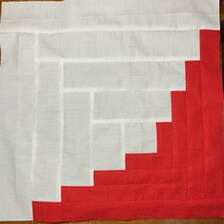
March 2019
"Churn Dash"


February 2019
"Starburst"
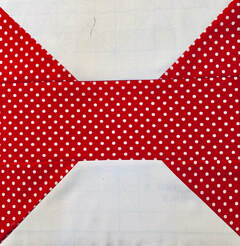
January 2019
"Spool"
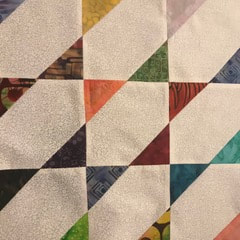
December 2018
"Shooting Star"

November 2018
"Road to California"
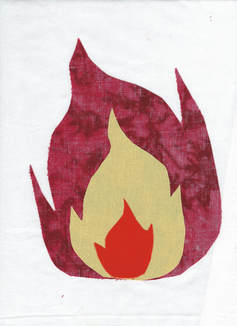
October 2018
Flame
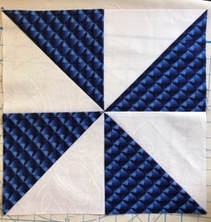
August & September 2018
Pinwheel
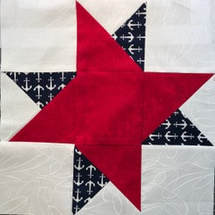
July 2018
4th of July

June 2018
Hot Air Balloon
Instructions: Click here
Pattern: Click here

May 2018
Butterfly
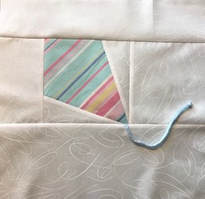
|
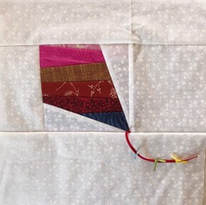
|
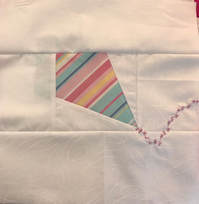
|
April 2018
Go Fly a Kite
March 2018
Out Like a Lamb
Permission to use by Original Designer Nancy Hicks
February 2018
Playful Hearts
Original design from sewmamyblocks.com
December 2017
Starflakes
October/November 2017
Pumpkin Patch
September 2017
Back to School
August 2017
Sunburn
July 2017
Uncle Sam's Bowtie
June 2017
Log Cabin Watermelon
May 2017
Wild Spring Poppies
March 2017
Friendship Block
Guidelines
Using fabrics from your own stash create a quilt block based on the guild pattern and instructions provided. There is no limit regarding the number of blocks entered however, fabrics should vary to maintain a scrappy feel.
Additional information you should know:
- For each block completed, write your full name on a small piece of paper, and attach to the completed block with a pin.
- Bring your completed blocks to the general meeting. Blocks will be displayed for members to see. For each block completed, enter your name in the drawing.
- If you are unable to attend the meeting, but want to participate in Block of the Month, please arrange to have completed blocks at the general meeting either by contacting the chairman in advance or asking a quilting friend to help.
- At a specified time at the general meeting, based on participation, one or more names will be drawn to win quilt blocks. Example: If we receive 30 blocks, we will have two winners. The first winner will pick 15 blocks; the second winner will receive the remaining. There will be no limit to the number of times you can win.
- In fairness to all, if blocks are incorrect in size, have an obvious error, or are incomplete, will be returned to the maker and will not be eligible for the drawing.
Additional information you should know:
- Please use 100% cotton fabric. Wash and preshrink fabric and test for colorfastness before constructing your block.
- Measure fabric and cut accurate to insure proper block construction. It is very important to accurately construct your block using 1/4 inch seam allowances.
- Press seams. Use an up and down motion as not to distort fabric.
- There should be no need to "square up" if pieces are cut correctly, have been sewn with proper seam allowances, and pressed properly without distortion. (Your very best work is expected.)
- Finished size of the block is the actual size of the block when sewn into a quilt top. Unfinished size is the block with seam allowances. So, if you are making a 6" block finished in a quilt, the unfinished size should measure 6-1/2" because of the 1/4" seam allowance. I hope this makes sense!